
Power of MCP in Windsurf IDE : A Developer's Step-by-step Guide
Guide to setup MCP in Windsurf IDE. Setting up MCP in Windsurf can help you get access to local files, access external tools using API right from your Windsurf Cascade Terminal.

As promised in my previous blog post about the Windsurf Wave 3, today I am writing about setting up and leveraging the Model Context Protocol (MCP) in Windsurf IDE.
What is MCP and Why Should You Care?
MCP (Model Context Protocol) is a revolutionary open-source protocol that bridges the gap between Large Language Models (LLMs) and external tools/services. Think of MCP like a USB-C port for AI applications. Just as USB-C provides a standardized way to connect your devices to various peripherals and accessories, MCP provides a standardized way to connect AI models to different data sources and tools.
Created by Anthropic Team, MCP is fast becoming the standard way for LLMs to interact with external tools and services. In Windsurf IDE, MCP enables Cascade (the AI assistant) to interact with custom tools, making it more powerful and versatile than ever before.
MCP is powered by a set of servers that you can install and manage yourself. These servers are designed to be secure and easy to use, making them a great addition to your development workflow. As an open-source project hosted at github.com/modelcontextprotocol, the protocol benefits from community contributions and improvements, ensuring it stays up-to-date with the latest developments in AI technology.
How MCP Works
At its core, MCP follows a sophisticated client-server architecture:
Host Application (Windsurf)
Acts as the primary environment where the LLM (Cascade) operates
Manages connections to multiple MCP servers
Handles security and permissions
Client (Cascade)
Maintains 1:1 connections with MCP servers
Requests specific tools and context when needed
Processes responses and integrates them into its workflow
MCP Servers
Provide specialized tools and services
Handle specific functionalities (e.g., file operations, API integrations)
Return structured responses that Cascade can understand and use
The communication flow works like this:
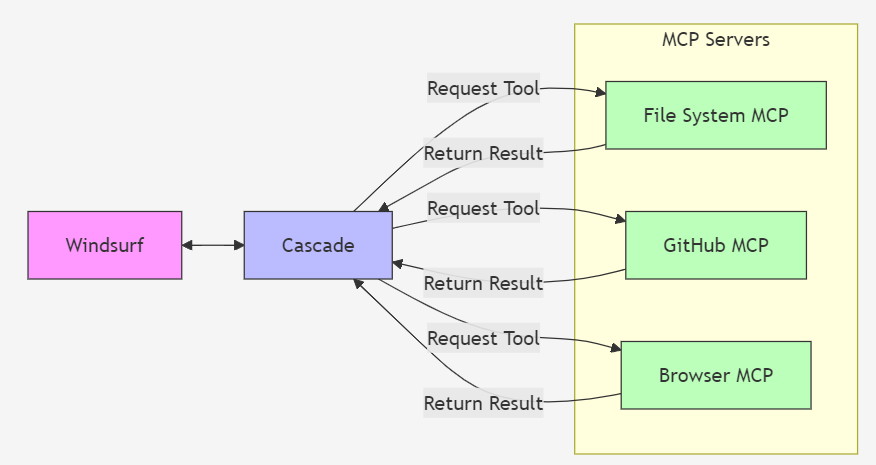
When you ask Cascade to perform a task, it:
Identifies which tools are needed
Connects to the appropriate MCP server
Sends structured requests for specific actions
Receives and processes the responses
Integrates the results into its response to you
Checkout my previous blogs :


Key Benefits for Developers
Custom Tool Integration: Create and use specialized tools tailored to your development needs like building a custom MCP server that integrates with your company's internal APIs
Enhanced AI Capabilities: Give Cascade access to external services and data sources like connecting to database systems for real-time data queries.
Example - Brave Search MCP enables Cascade to perform web searches and retrieve up-to-date informationWorkflow Automation: Streamline repetitive tasks with custom MCP servers like automating deployment processes through Docker MCP
Secure Access: Standardized protocol for safe interaction between LLMs and external tools. The servers run on your local computer.
Setting Up MCP in Windsurf IDE
Let's walk through the step-by-step process of configuring MCP in your Windsurf IDE environment.
Prerequisites
The latest version of Windsurf IDE installed
Node.js and npm installed on your system
Basic understanding of JSON configuration
Git installed (for some MCP servers)
Step-by-Step Configuration
Click on the Hammer Icon on the Cascade Tool bar. If you hover on the hammer icon, you can see the list of MCP Tools connected to it.
Click on the Configure option and you can see a new file opened where you can configure the MCP Tools
Go to https://opentools.com/ or https://github.com/modelcontextprotocol/servers or https://windsurf.run/ to discover the various MCP servers available that are built by the community and companies as well.
Let’s connect our local filesystem via MCP
{
  "mcpServers": {
      "filesystem": {
      "command": "npx",
      "args": [
        "-y",
        "@modelcontextprotocol/server-filesystem",
        "C:/Users/akhil/Desktop",
        "C:/Users/akhil/Downloads",
        "C:/Users/akhil/AppData/Roaming/Claude"
      ]
    }
  }
}
Once you save the Config, you can click on the “Refresh” button and it will start the Server and connect it to Windsurf Cascade.
Now you can do the following tasks with that like :
filesystem_read_file

This is a tool from the filesystem MCP server. Read the complete contents of a file from the file system. Handles various text encodings and provides detailed error messages if the file cannot be read. Use this tool when you need to examine the contents of a single file. Only works within allowed directories.

filesystem_read_multiple_files

This is a tool from the filesystem MCP server. Read the contents of multiple files simultaneously. This is more efficient than reading files one by one when you need to analyze or compare multiple files. Each file's content is returned with its path as a reference. Failed reads for individual files won't stop the entire operation. Only works within allowed directories.

filesystem_write_file

This is a tool from the filesystem MCP server. Create a new file or completely overwrite an existing file with new content. Use with caution as it will overwrite existing files without warning. Handles text content with proper encoding. Only works within allowed directories.

filesystem_edit_file

This is a tool from the filesystem MCP server. Make line-based edits to a text file. Each edit replaces exact line sequences with new content. Returns a git-style diff showing the changes made. Only works within allowed directories.

filesystem_create_directory

This is a tool from the filesystem MCP server. Create a new directory or ensure a directory exists. Can create multiple nested directories in one operation. If the directory already exists, this operation will succeed silently. Perfect for setting up directory structures for projects or ensuring required paths exist. Only works within allowed directories.
Start asking a query in Cascade like
Copy the latest file in Downloads folder to the current folder. Ensure that MCO has access to both these folder.
Create a new Directory in Desktop
Integrating MCP Server to External Application via API : Firecrawl.dev
Go to https://github.com/mendableai/firecrawl-mcp-server or go to Open Tools and search for Firecrawl Dev.
You will see the MCP server details like the one below:
"mcp-server-firecrawl": {
      "command": "npx",
      "args": ["-y", "firecrawl-mcp"],
      "env": {
        "FIRECRAWL_API_KEY": "YOUR_API_KEY_HERE"
      }
    }
  }
Get your Firecrawl API Key from https://www.firecrawl.dev/app/api-keys and paste it in the code “YOUR_API_KEY_HERE” and save it
Once you save the Config, you can click on the “Refresh” button and it will start the Server and connect it to Windsurf Cascade.

Testing MCP Server
For testing the Filesystem , ask it to copy any file from your Desktop to the current file
For testing Firecrawl.dev, ask it to scrape any specific website and check the output.
Windsurf IDE supports a growing ecosystem of MCP servers. Here are some popular options:
MCP Servers
Official Servers
Filesystem MCP: File operations and management
GitHub MCP: GitHub API integration
Brave Search MCP: Web search capabilities
Playwright MCP: Browser automation and testing
Community Servers
Vercel MCP: Deployment and hosting integration
Database MCP: Database operations and management
Docker MCP: Container management
AWS MCP: AWS service integration
MCP Marketplace
The MCP ecosystem is constantly growing. You can find and share MCP servers at:
For more information about Windsurf's features, check out my previous articles on Happy coding! 🚀